Pop quiz: what’s the safest way to stretch your hamstrings?
I’ll give you 3 Clues:
It’s not a standing pose
It’s safe for those with herniated discs
You can do variations of this pose standing, seated, and probably kneeling (if you’re talented 😜)
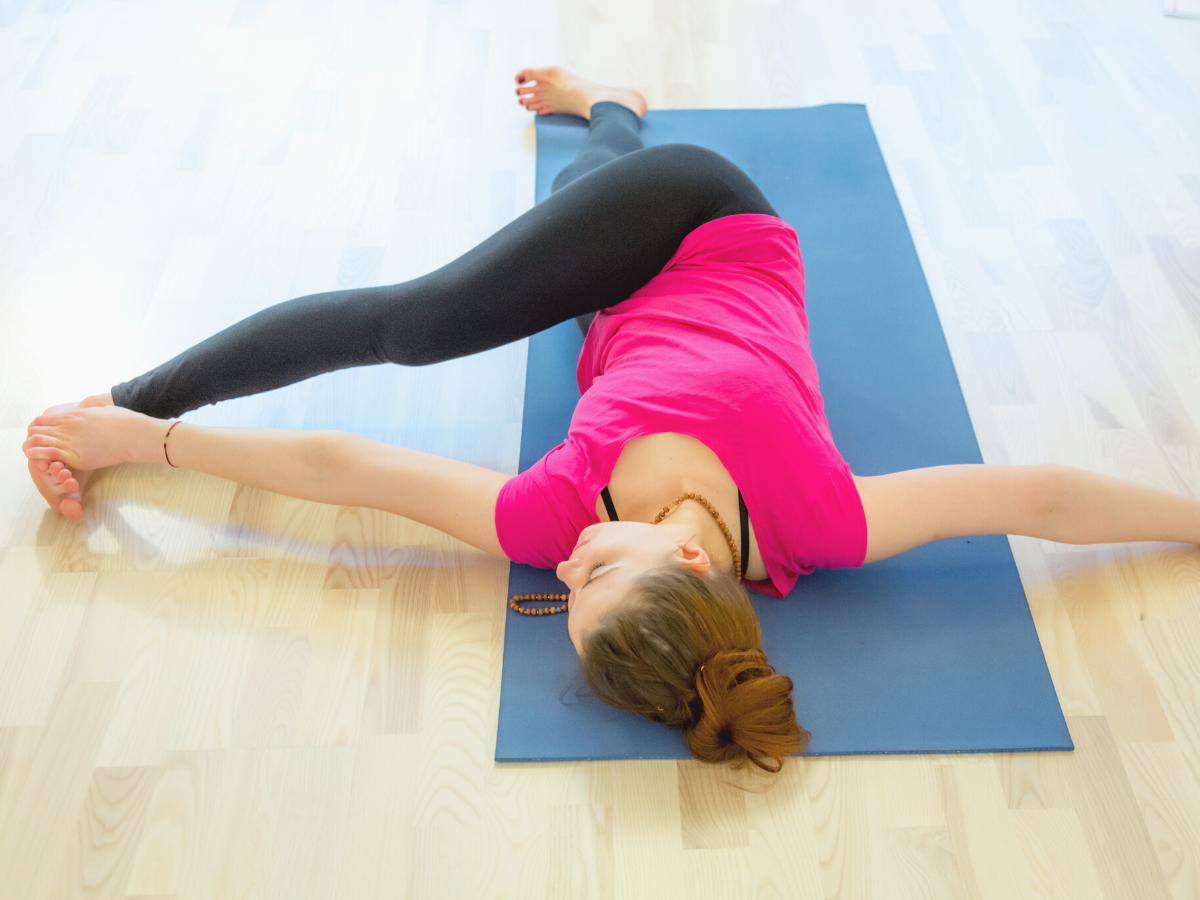
Did the blog photo give the answer away? You’re smart. You knew the answer before the clues, didn’t you? 🙌
Supine extended hand to big toe pose or Supta Utthita Hasta Padangusthasana (it’s a mouthful in any language 😅) is the safest way to stretch out the hamstrings and many other muscles of the legs, especially for those of you with herniated discs, stenosis, or osteoporosis (more on that later).
The pose is actually 3 poses-in-one and all 3 are safe for almost EVERYONE. If you’re a budding yoga instructor, or an avid home yoga practitioner, this is one you should do regularly too.
And to save some reading of words I’ll use “Hand to Big Toe Pose” but know (unless otherwise stated) I’m referring to the supine extended version. Got it? Good!
And Hand to Big Toe Pose can literally be done in all the ways:
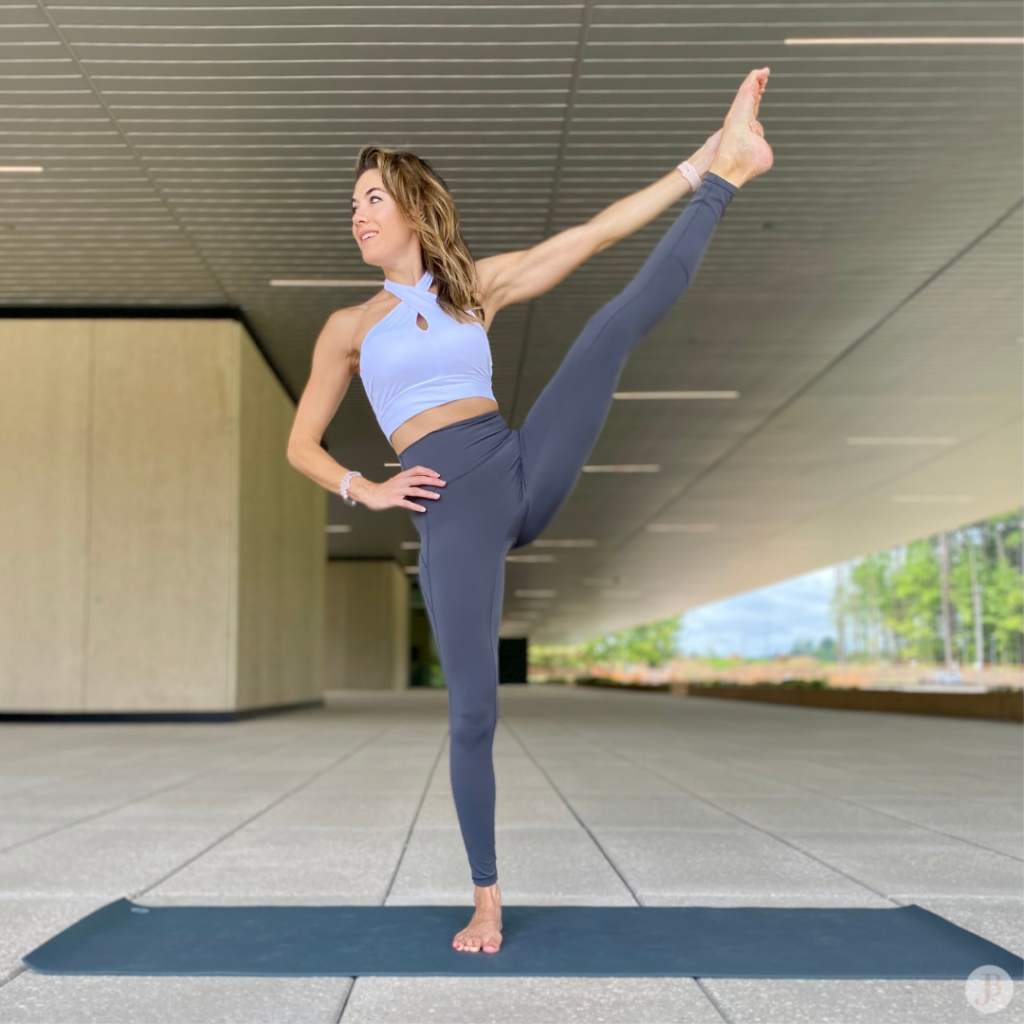
Standing up – part of the ashtanga primary series
Seated – a fun closed chain approach
Kneeling – if you’re up for a wicked challenge. Good luck!
And as you already know, this post is about the safe version: Supine.
You can take all the principles discussed here for the supine version and apply them to the other positions. Though the stability, safety, and accessibility of the pose will change.
Who is the pose for?
EVERYONE.
Don’t do it if…
The only contraindication is if you can’t lie flat on your back for any reason. You can elevate your head, or torso, as needed to make this pose accessible for you. If you have any of the following (not an exclusive list) elevate your head/torso as needed:
Uncontrolled/extremely high blood pressure
Uncontrolled/extremely low blood pressure
Retinopathy
Far along in pregnancy and can’t lay on your back
Don’t want to, or can’t lie on your back for any reason
** Reading Break ** This blog post DOES contain affiliate links of related products I love and they might even be pictured. If you click on a link and purchase a product (or service) it costs you nothing, you MIGHT even get a discount, and I MAY even receive a SMALL commission. This helps me to buy and drink coffee ☕️ in order to keep me awake and provide you with amazing free content 💗 Thank You for supporting my content 💋
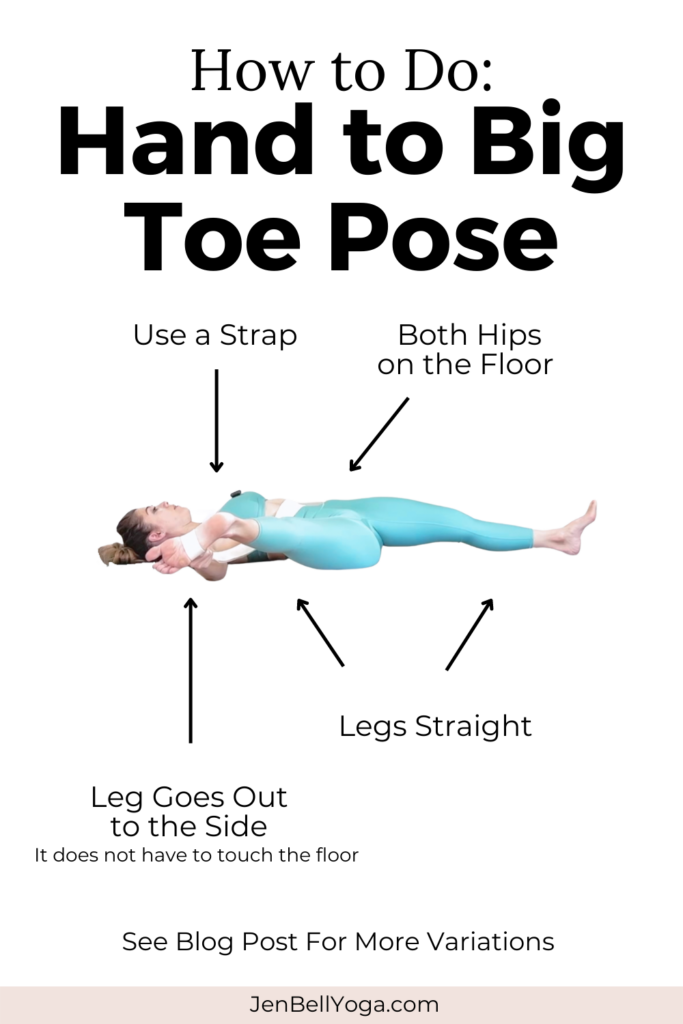
101: How to set up Supine Extended Hand to Big Toe Pose (Supta Utthita Hasta Padangusthasana)
“All the cool kids use props”
~me
There are a lot of neurological and physiological reasons to use props to deepen your practice (I show how in the video). For hand to big toe pose a …
Strap can be used to keep the focus on the hamstring stretch, and not prying your arm out of the socket.
Block or bolster to create a feeling of safety to allow your brain to tell your hamstring to relax and lengthen (the whole purpose of stretching)
Don’t you want to be cool? Grab those props! And let’s get started!
Let’s Get Into It: Moving In and Out of Hand to Big Toe Pose
In previous posts like child’s pose, crow pose, and tree pose, this is the place where I tell you what the pose looks like while you’re in it. Then I go on to tell you how to *ideally* get in and out of the pose. But, since hand to big toe pose is 3 poses, I combined the two sections and move you from one to the next as if we were in class together starting with the right side.
The basics:
To start lie on your back (aka supine)
Have your strap (or any other props) within arm’s reach
Your legs can be long on the floor, or (my preference) soles of the feet on the mat with knees pointed up at the ceiling.
Position Check: For this pose we want the spine to be (and feel) long.
Tuck your pelvis under (so the low back comes towards the floor) to lengthen your lower back
Walk your shoulders down the back
Tuck your chin slightly to lengthen the back of your neck
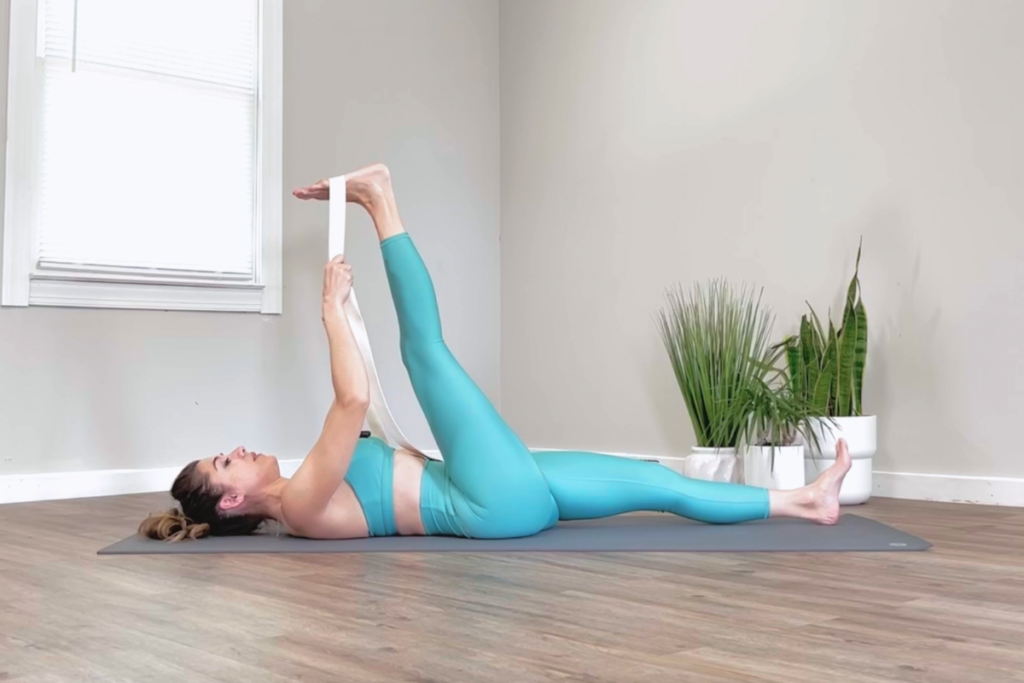
Place your strap over your right foot hold one side of the strap in the right hand and the other side in the left hand
Begin to straighten your leg allowing the strap to slide through your hand so you still have tension in the strap but you’re not yanking on your leg
You can close your eyes or gaze up at your leg
Once your leg is straight: pause, breath: and notice what you feel
If you would like to intensify the stretch, gently use the strap to pull the right leg closer towards the face
Breathe and relax everything else
Important notes
The right foot (extended leg) can be pointed, flexed, relaxed, or somewhere in between. Traditionally the foot is flexed (dorsi flexed).
Traditionally the left leg is straight on the floor, knee pointed up to the ceiling, and foot flexed (dorsi flexion). BUT in real life, your left leg can stay in the starting position (straight or bent) and can move into another position as you would like. Do what feels best for you, in your body, at that moment.
Sometimes there’s a tendency to over-engage the muscles of the arms to aid in the stretch, but if you’re creating tension in the upper body to create length in the lower body is this most beneficial for you? Try to keep your arms bent and heavy, to allow gravity and the weight of your arms to pull your leg down for you.
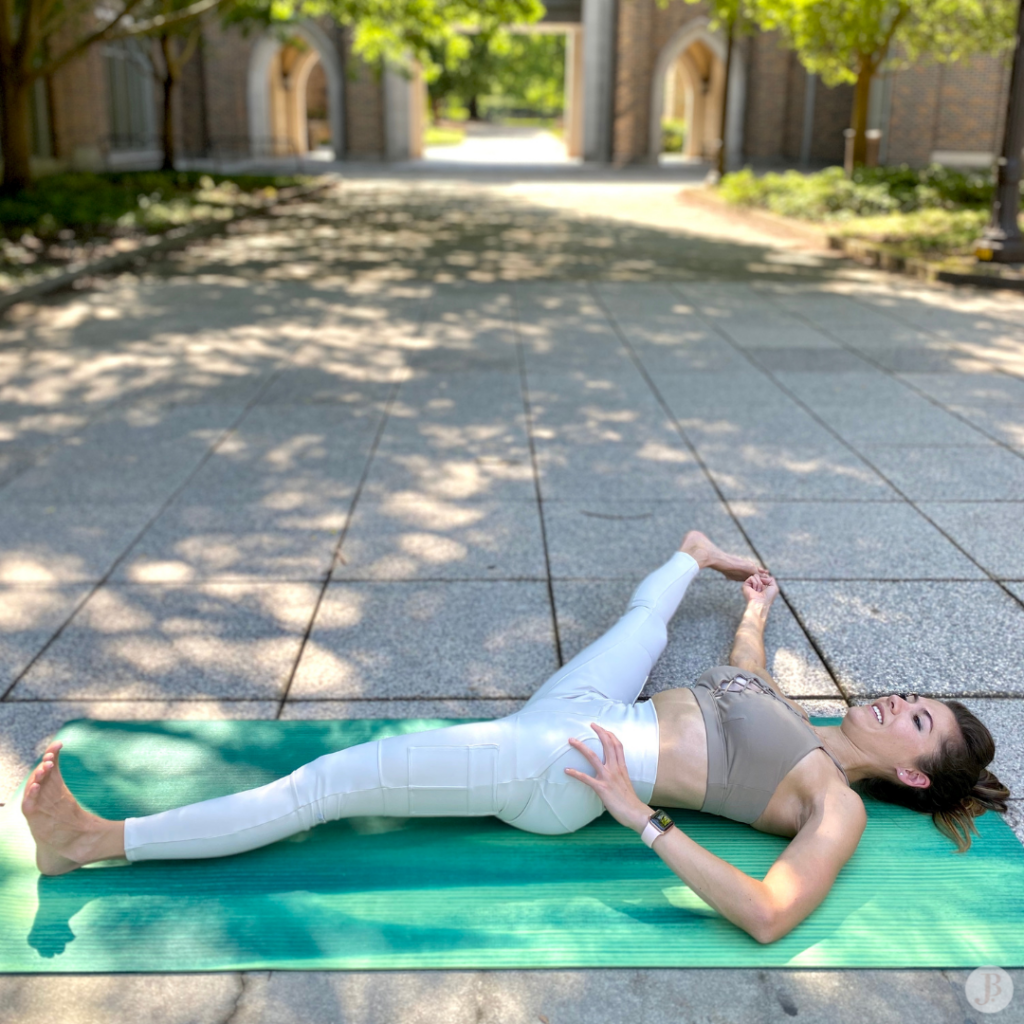
Part 2 – Out to the Side
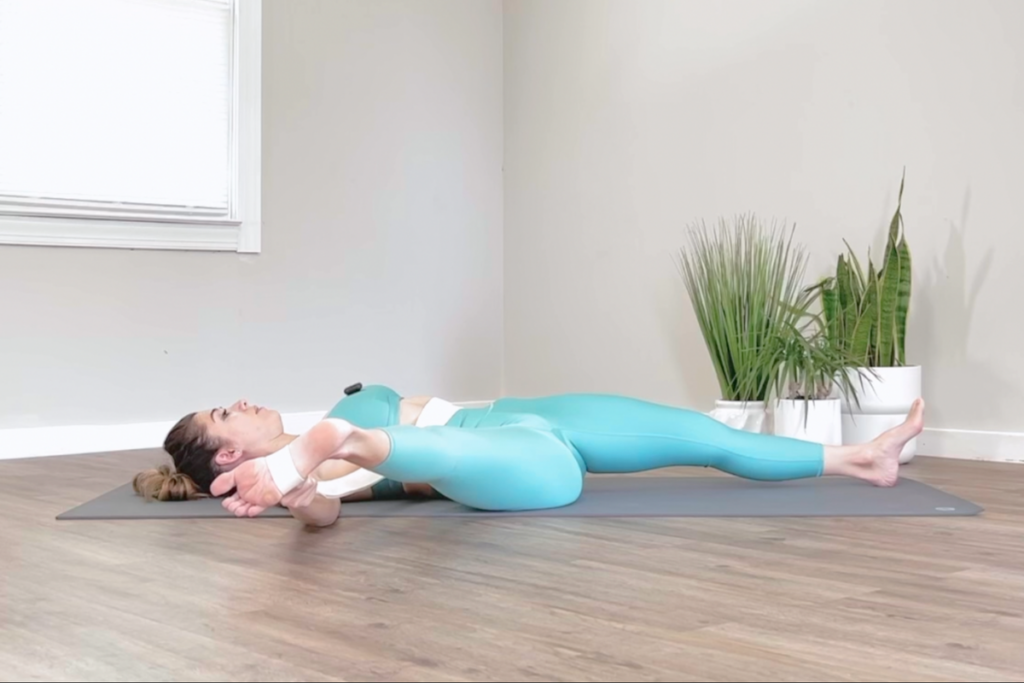
Starting where we left off above in Part 1, take both sides of the strap into your right hand.
Allow the right leg to move out to the right side of the body
Left arm goes out to the side. Traditionally the arm is extended straight out from the shoulder. (But if that doesn’t work for you see the notes below.)
Move your right hand up or down the strap into a position where your right arm and shoulder use minimal effort
Feel free to keep your gaze up, turn it to the left, or turn it to the right
Breathe
Important notes
It’s OK if the right leg does NOT touch the ground check out this variation if you want support
Left leg can be bent (with the foot on the floor) or straight out
Keep the right shoulder relaxed and softened away from the ear
The left hip may lift off of the floor A LITTLE
If there’s too much lift in the left hip, draw the right leg up so it’s more over the body.
Both feet can be flexed, pointed, relaxed, or somewhere in between
If the left arm is uncomfortable check out this variation
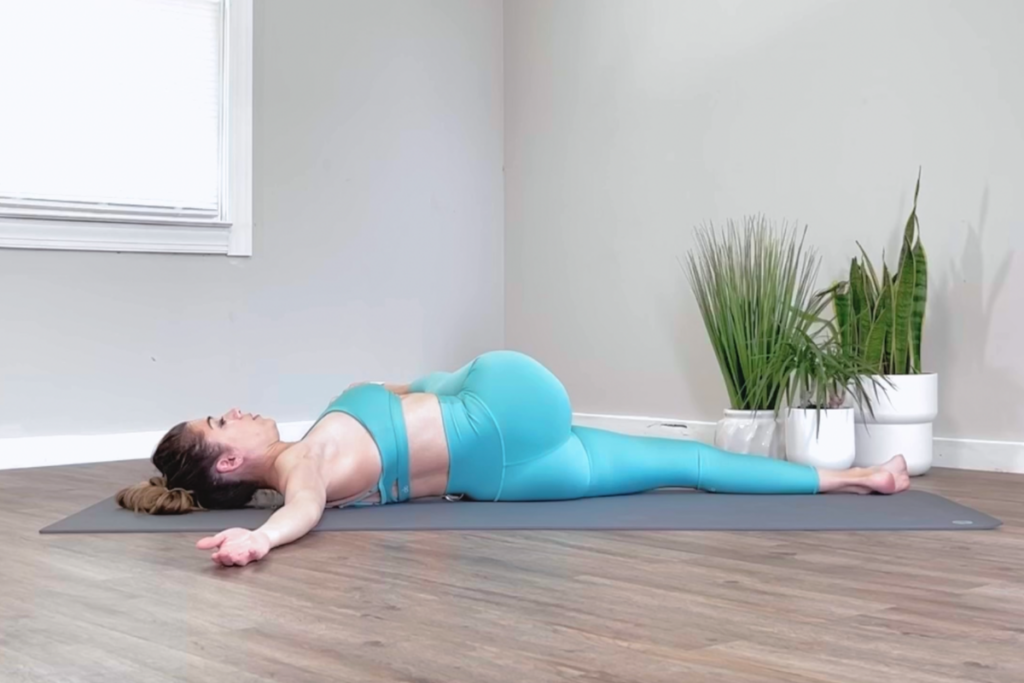
Part 3 – Across the Body
Moving on from where we left off in Part 2 – lift the right leg over the body
Question: “do you have to do the right side first?”
Answer: “Yes and no.”
This is the most asked question during yoga teacher trainings. I live in the world of “It’s not right or wrong.” In most things, yoga-related, an argument could be made for either side. So here are my answers to that question.
Yes: The reason why you would do the right side first is because your ascending colon (the first part) is on the right side. When you do your right leg first, the movement made in the pose massages that side of the body (colon) stimulating and increasing its motility. When you move on to the left side it continues along the digestive tract moving to the descending side of the colon. This keeps everything in working digestive order.
No:Like all things yoga, doing the opposite side first helps to create new neural pathways by doing something different.
The choice is yours. There is no right or wrong here. If you are a yoga teacher and plan to do the left side first, I encourage you to tell your students WHY you are doing it that way.
4 Powerful Variations to switch up Hand to Big Toe Pose
There are a lot of variations to Extended Hand to Big Toe Pose and I haven’t even gone over the traditional version yet 😅 Since there are a lot of subtle variations, below I show you 4 big ways to change it up.
1. Mix it up: Change your position
As I mentioned at the beginning there are a few ways to do this pose the exact same way but all you have to do is change your physical position. The directions are the same, and because it falls under “variations” I’ll reiterate them here (especially if you skipped ahead 😜). A few ways to challenge yourself in the pose:
Standing
Seated
Kneeling
2. Traditional: Ditch the Props
Traditionally no props are used to do this pose. I intentionally used a strap in the video, AND in the description, because it’s safer for everyone. And a strap is no hindrance to even the most flexible (all they have to do is hold the strap at the foot). IF you find yourself without a strap there are a few options:
Hold behind the thigh (you might want to switch your grip when you take the legs to the sides)
Hold behind the calf (you might want to switch your grip when you take the legs to the sides)
Two peace fingers (index and middle) around the big toe. This is that traditional variation I keep referencing.
Otherwise, the instructions are the same.
3. Supported: All the feels
There are a variety of ways to do supported hand to big toe pose. You can combine more than one of these together if it makes sense for you. Don’t forget to check out the video where I show a few of these supported options.
Use a strap (it’s still a way to SUPPORT your practice)
Place a rolled blanket under the non-extended leg knee
Place sandbags on the shoulders
4. Give yourself a hand: What to do with your arms
It’s traditional to have your arms out at a “T,” but there could be a whole lotta reasons why you can’t or don’t want your arms out. The supporting arm for the extended leg doesn’t have a lot of options, but the opposite arm does. Give these a try:
T – straight and directly out from the shoulder
Cactus – elbow bent 90 degrees and directly out from the shoulder with or w/o the support of props under the forearm
Y – straight and at an angle between shoulder height and alongside the ear
I – straight and alongside the ear
Hand to the hip
V – straight and somewhere between shoulder height and alongside the leg
Alongside the leg
Bent and anywhere in between
On top of the thigh
Am I doing this right? What you should be Feeling in Hand to Big Toe Pose
Everyone, and every body, is different. This is a general break down of how you could feel in supine extended and to big toe pose with a strap.
Lower Body
The extended leg is straight
Part 1 – your hamstring (back of your leg) will feel a stretch
Part 2 – your hamstring will still feel a stretch but it might have moved towards the inner thigh, and yes, your inner thigh (adductors) will also feel a stretch
Part 3 – your hamstring will still feel a stretch but it might have moved towards the outer thigh. You might feel a stretch in your “IT band,” outside of your leg, and outside of your hip (glute medius)
The calf of the extended leg may feel a stretch especially if your foot is flexed (dorsi flexed)
The non-extended leg may (or may not) feel a stretch. IF you feel a stretch it will most likely be in the hamstring or the front side of the hip.
Torso
Part 3 – You might feel a stretch in your core (obliques)
Upper Body
If your chest (pectoralis major/minor) is tight you may feel a stretch here
If you turn your head during the pose you may feel a stretch in your heck
You should NOT feel any tension in the upper shoulders, upper arms, or neck during this pose.
Let’s Nerd Out: The Anatomical break down of Hand to Big Toe Pose
Need a quick reference?
Here’s a shortened anatomical break down of what happens in this pose:
Muscles Worked
Theoretically, NONE. This pose is meant to be a stretch, and the supine version with a strap should be as restorative as possible. IF someone wants to intensify the stretch and is already flexible then the following muscles MAY be used:
Biceps
Muscles Stretched
Part 1-3: Hamstrings, (maybe) gastrocnemius and soleus
Part 3: Glute medius, glute minimus, (maybe) piriformis, (maybe) tensor fascia lata
Why is it the safest way to stretch your hamstrings?
In supine extended hand to big toe pose with a strap, your spine is supported by the floor creating a “closed chain” movement/stretch. When the spine is stabilized, it prevents you from rounding (or arching) your spine, isolating the stretch to the hamstrings and keeping your spine safe. This is why hand to big toe pose with a strap is the safest way to stretch your hamstrings, especially for those with herniated discs, stenosis, and osteoporosis
Did you enjoy this blog post? Did you learn something? If so, please please sign up for the newsletter below for more tips on how to do traditional yoga poses as well as yoga therapy practices to improve your overall wellbeing.
Want to know what’s going on?
Find out what’s going on… You know you want to… Privacy is important, I won’t sell your info, I promise.