Beginner Yoga • Yoga • Yoga Pose
May 31, 2022
Arm balances are great party tricks! They look cool, powerful, and hard to do. Is that why you want to do them? Maybe. Or maybe not. I honestly can’t say I’ve done crow pose (bakasana / kakasana – more on that later) at a party, but I’ve definitely done a handstand or another inversion (still in the category of arm balances). They’re absolute show stoppers, and why shouldn’t they be? They take great strength and skill to learn, they require letting go of fear and a level of focus to achieve. Once you get an arm balance, they can be fun, thrilling, and can make you feel more confident. Most people don’t think of arm balances as a confidence builder, but they really can be great tools to help you find that internal strength along with your physical strength.
You might already know by now, but if you’re an auditory or kinesthetic learner, here’s the YouTube video that explains how to get into crow. This blog post goes into way more detail on how to overcome the challenges of Crow Pose, so be sure to keep reading.
Arm balances require you to conquer the fear of falling. Sometimes it’s just the fear of falling out of the pose, sometimes it’s the fear of falling on your side, and other times (like with Crow Pose) it’s about the fear of falling on your face. Ouch! Fortunately, yoga is a practice, and what is practiced in every class is breathing and being present. Both of these things are extremely important when learning how to do arm balances.
Simply, when we breathe deep and slow, and into our abdomens we tell our minds that we’re safe. (The physiology of breathing will be in another post to come soon.) Like everything in life, if we move from a place of security and stability we are more likely to be successful. Creating a stable foundation in crow is important, and it starts with the breath.
I teach crow pose in 99% of my classes. I teach it the same way every time because it works best for most people most of the time. There are a lot of theories on how to do crow, but in the end, it starts with just having a moment of flight and building up from there. This is my method for teaching Crow Pose:
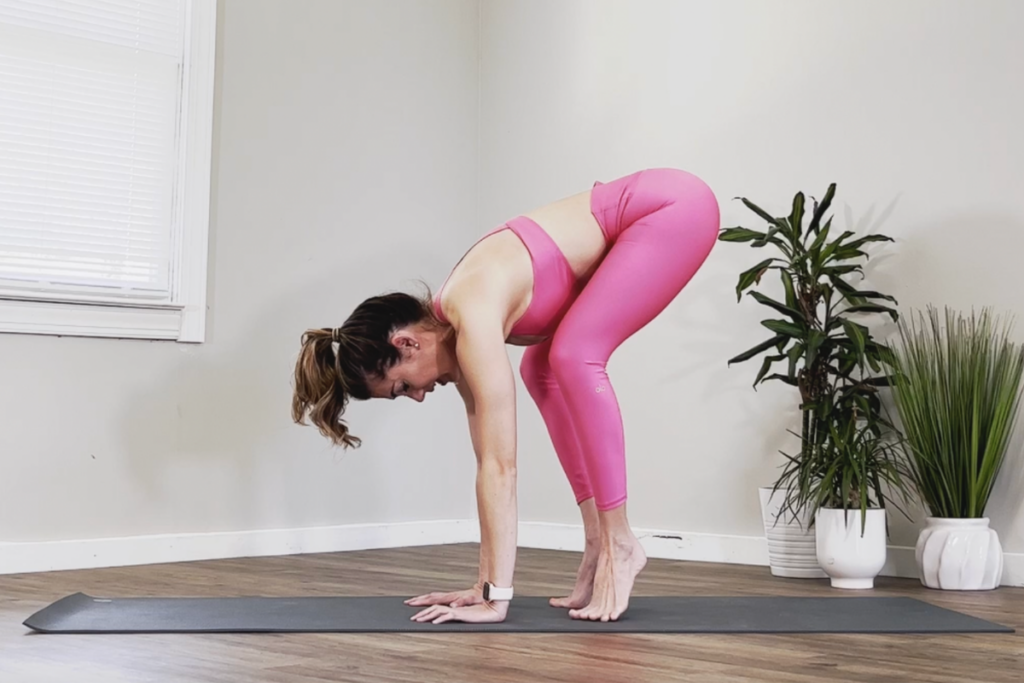
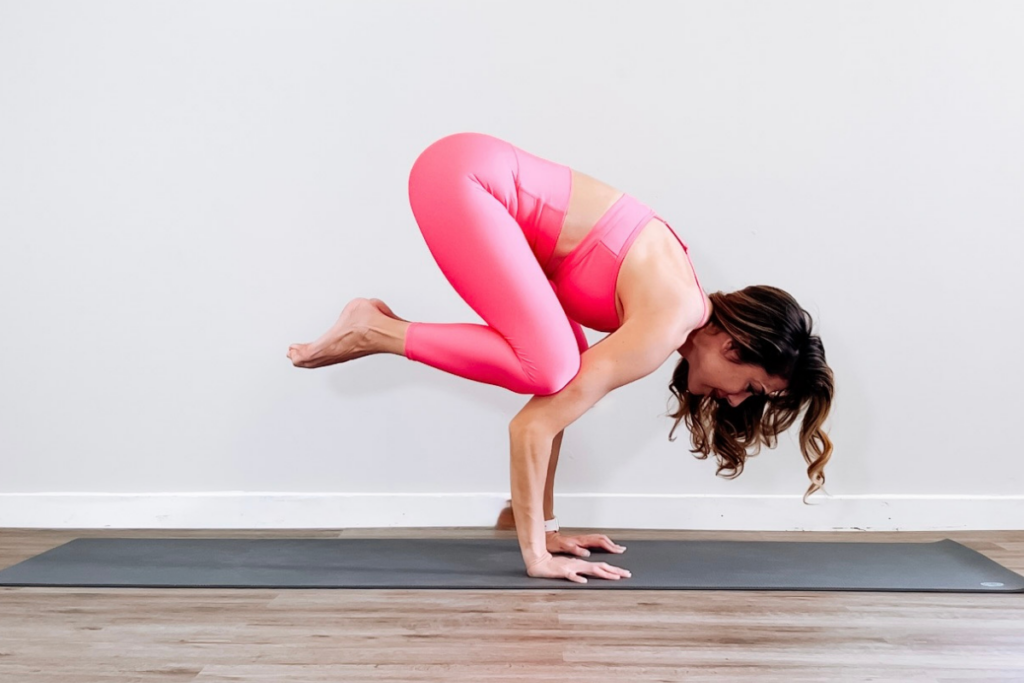
1. Start in Malasana, a.k.a. “yogi squat.” Feet are a little wider than hip distance apart (this can depend on anatomy and where you are flexible and tight).
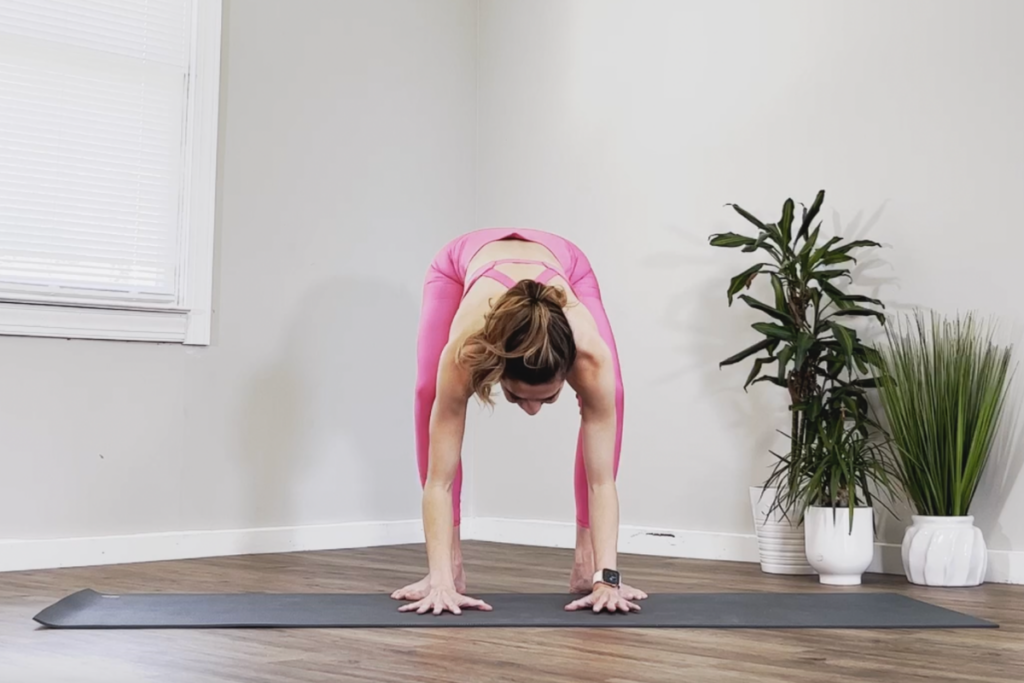
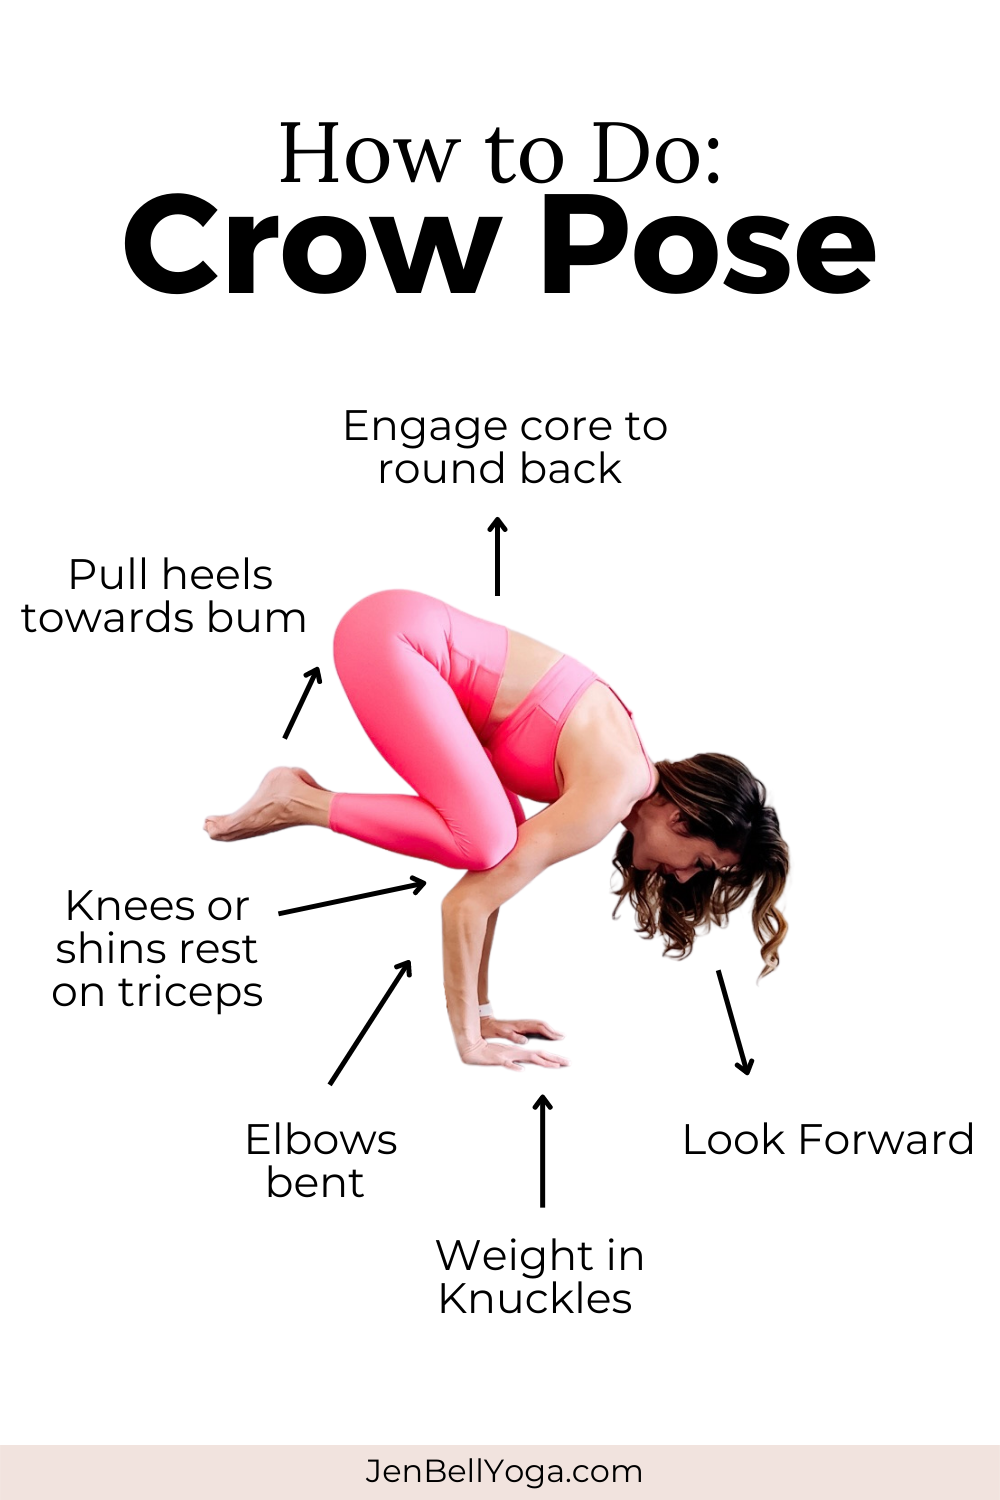
2. Place your hands on the ground directly under your shoulders. Fingers are spread. Focus on placing the weight into your fingertips and knuckles.
3. Lift your hips up to at least shoulder height keeping your knees bent.
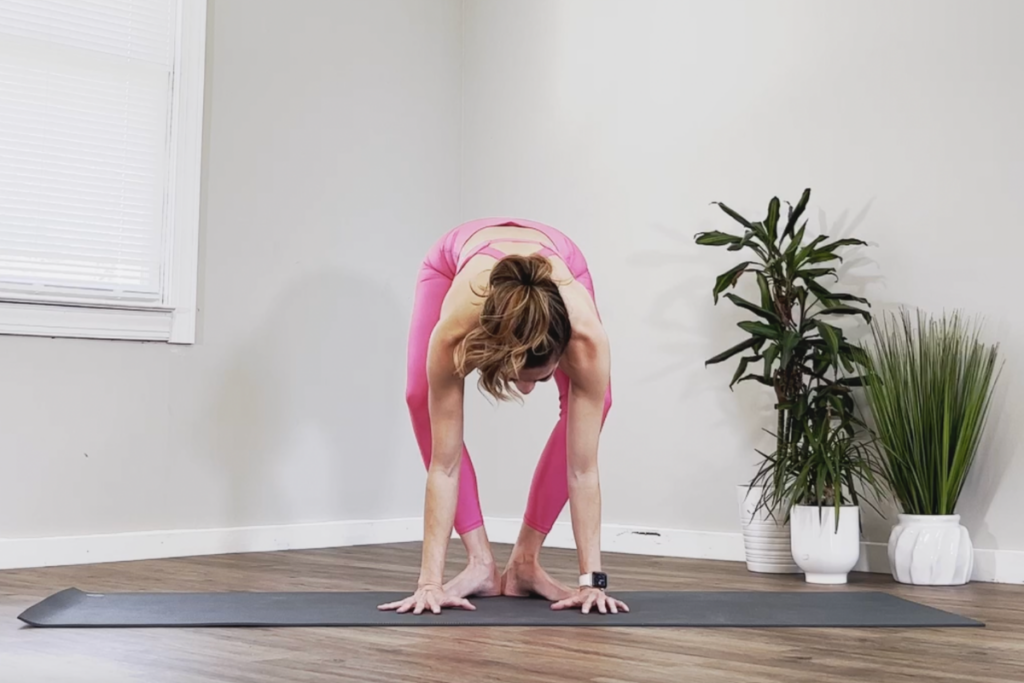
4. Heel-toe your feet inward until your heels touch. (keep your hips lifted)
5. Lift your heels, keeping the knees bent, and the HIPS LIFTED. 👈 This is struggle point one for most people. Make sure the hips are lifted to at least shoulder height.
6. Turn your gaze about 1 Ft (30 cm) in front of your hands. Keep your hips lifted.
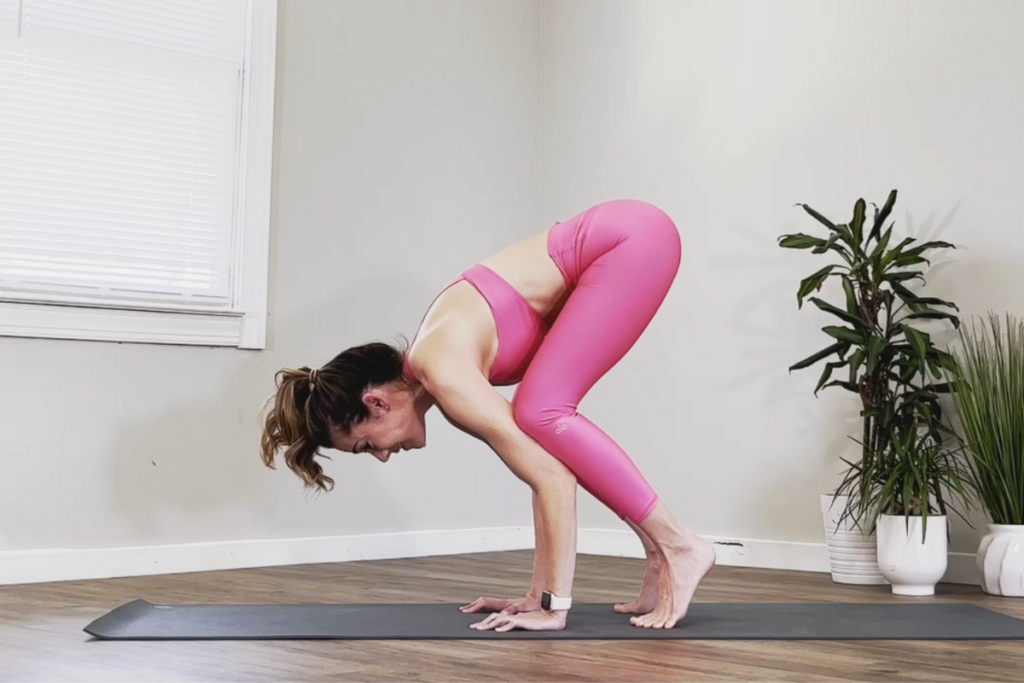
7. Bend your elbows back toward your shins. KEEP your gaze forward and hips lifted.
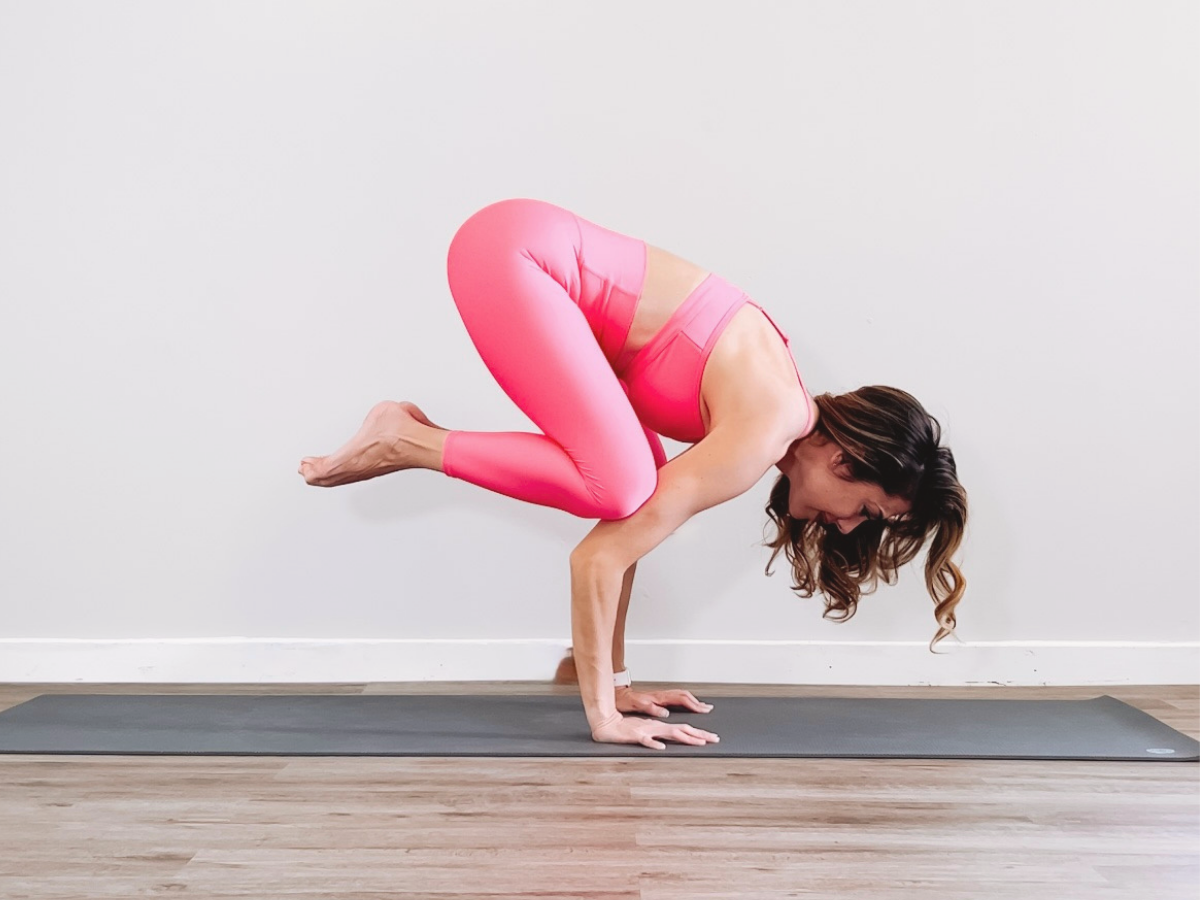
8. Lean forward so the shins connect to the backs of the upper arms. This can look different for everyone. The more secure you feel the better. For some people, it’s about laying the shins on as much surface area as possible on the backs of the upper arms (your triceps). For others, it’s about preventing as much slipping as possible and placing the shins nearly perpendicular to the triceps. Connection and stability is important here.
9. Engage your core (transverse abdominis) by rounding your back towards the ceiling and drawing the space below your navel in towards the spine through muscle engagement. This is where the strength of the pose happens. Think about doing a “cat” back from cat pose.
10. Shift your weight a tiny bit further forward so you feel your weight centered over your hands. Remember: Hips are lifted above shoulder height, gaze is a foot in front of your hands, core is engaged, and continue to breathe.
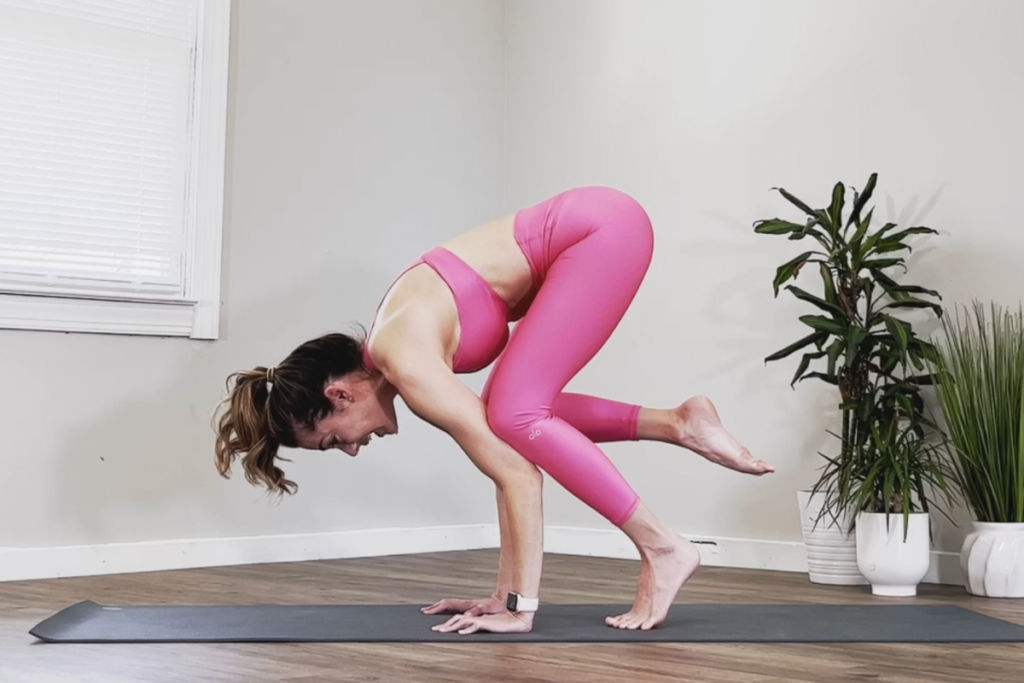
11. Try picking up one foot. Remember: Hips are lifted above shoulder height, gaze is a foot in front of your hands, core is engaged, and continue to breathe.
12. Option to place the foot down and try the other foot. Remember: Hips are lifted above shoulder height, gaze is a foot in front of your hands, core is engaged, and continue to breathe.
13. Try picking up one foot – feel the stability – then the other foot. Remember: Hips are lifted above shoulder height, gaze is a foot in front of your hands, core is engaged, and continue to breathe.
14. Breathe
In crow pose, you may find yourself moving one direction or another. For most people, there are two key adjustments you can make and even focus on ahead of time.
I used to have a friend that would say “still the party in your mind to still the party in your foot” This was in reference to standing balances, but the same could be said for arm balances. The more you are wrapped up in your mind the less present you are in your pose (no matter the pose). This is the reason why crow is typically done in the middle to the end of class. You’ve had at least 30 minutes to steady your mind, and stabilize your breath. By the time you get to crow pose you’ve forgotten about work, the laundry, and (hopefully) what you’re having for dinner. Once you’re up in crow, with a steady mind, you can make all the micro shifts and adjustments as needed to sustain the pose.
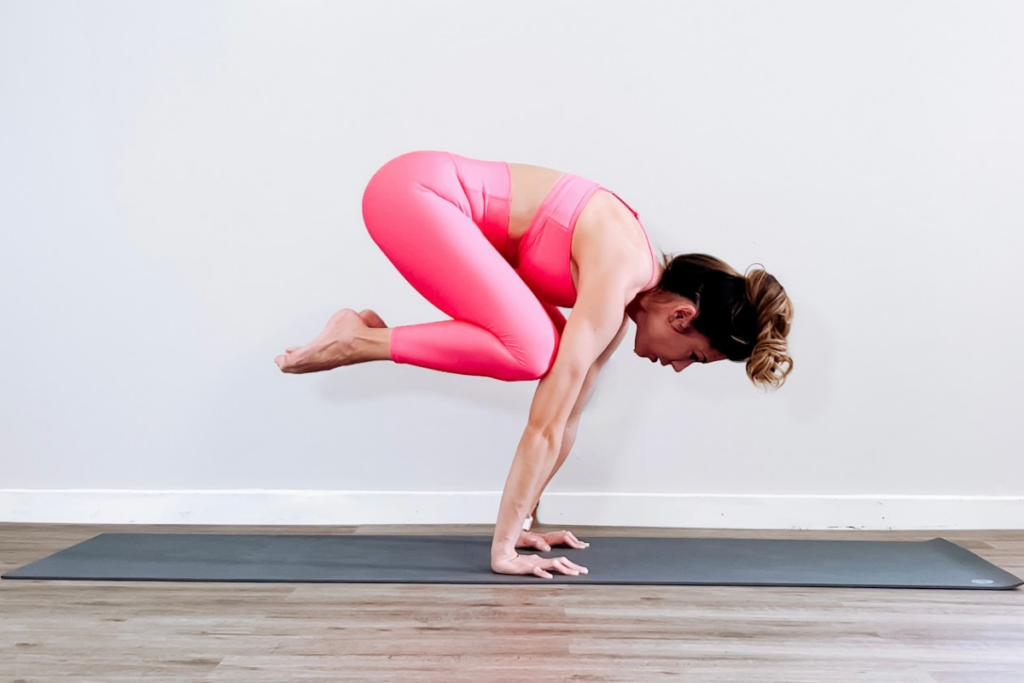
Your center of gravity in Crow Pose, or where most of your weight should be centered, is directly above your hands – the supports of the pose. That means to make this pose as stable as it can be, the weight in front of your hands should be equal to the weight behind your hands. This is how we build buildings, bridges, and even cars, and there’s a reason for that: it’s safer and more stable. Don’t go! This isn’t going to be a deep dive into physics, I promise! This information is to help you find stability in challenging poses, and I promise it’ll be easy to understand. Let’s continue… In the human body, for most people, the center of mass in your body is around your hips. For everyone, when we do Crow Pose (and even Crane Pose – yes, I’ll get to that soon) your hips are behind your hands, which is where your pose is supported. So what do we do? By turning your gaze forward, and extending your head further in front of your hands, you actually move your center of gravity forward over your hands. There are a couple more things you can do to help and I promised I wouldn’t get into a big physics lesson here (if you’ve taken my class you’ve probably already gotten that lesson 😉), so here are my pointers:
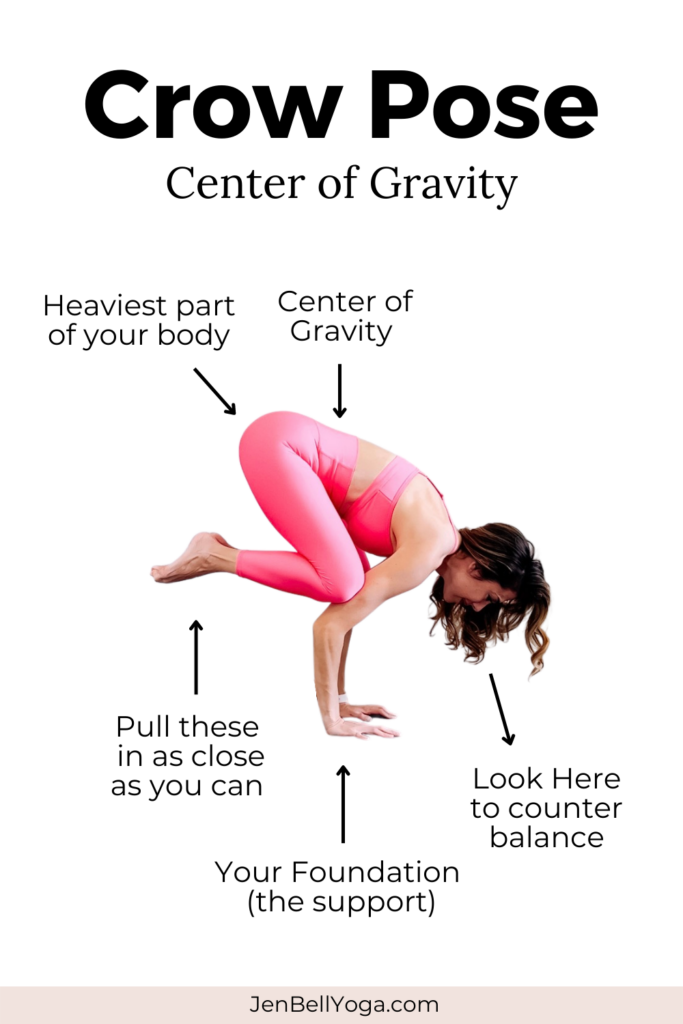
Besides fear, this is the biggest barrier to achieving crow pose that I see. There’s a lot of work that could be said and done when it comes to the things we say to ourselves, but that’s for another time. To demystify this, your arms are in a static hold. Both your biceps and your triceps are equally engaged to prevent your arms from collapsing. If your arms were straight your arm muscles would have to put in very little effort to support your weight. Your core, on the other hand, is trying to pull all that weight (see above) in as close as it can to your supports (your hands). The more your core is engaged the less the weight will be shifting forward and backward, the straighter your arms could be, the lighter the pose will feel, and the less effort your arms will need to work to support the pose. But yes, your core is working very very hard.
There are a few ways to prop Crow Pose to make it more achievable. I’ve seen (and even taught) a few other ways to prop your crow pose that are not listed here. Some of them, most people don’t have the equipment for, and others of them I’ve seen injure people. The two below I find to be the most accessible for most people.
** Reading Break ** This blog post DOES contain affiliate links of related products I love and they might even be pictured. If you click on a link and purchase a product (or service) it costs you nothing, you MIGHT even get a discount, and I MAY even receive a SMALL commission. This helps me to buy and drink coffee ☕️ in order to keep me awake and provide you with amazing free content 💗 Thank You for supporting my content 💋
Grab all of the pillows, cushions, and bolsters around your house and create a “crash pad.” I’ve spent a great deal of time talking about overcoming fear to become successful at this pose. Creating a safety net, or a soft place to land on in the event of falling can help lessen that fear.
Place a few blocks (or books) underneath the feet to get them closer to being “lifted.” This is more of a psychological trick. You still have to put in the same amount of effort, but you don’t have to use your hamstrings as much. For some people, this propping helps them feel like they’re closer to the pose. It can create a feeling of being lifted and confidence.
I’m not the type of teacher to make a big deal about the Sanskrit names, or the English names for that matter. If you’ve taken a class with me you know I like to sprinkle a little Sanskrit here and there. There are a few names I LOVE to say, and there are some that I’ll break down into their parts and explain. Crow Pose is one of those Sanskrit names that some people will get all into a tizzy over. So here’s the breakdown:
Crow Pose – Kakasana
Technically the elbows have a bend in them.
Crane Pose – Bakasana
Technically the arms are fully straightened.
Honestly, in real life, most students and yoga teachers will refer to either pose as “Crow Pose” or “Bakasana.” If you have deep feelings about either name in English or in Sanskrit, then go with what resonates with you. Yes, you may run into that odd teacher or student that will want to tell you the difference, but in the end, it’s about practicing the pose and not about the name.
If you haven’t watched it already, go over to YouTube to watch the video on crow pose, and subscribe to my channel while you’re there. And below is where you can sign up for my newsletter. Crow Pose (and arm balances) don’t need to be elusive. With the proper technique, most people can achieve an arm balance. I’ve seen 70-year-old women (beginner yogis) learn how to do, and successfully achieve, Crow Pose, so I know you can do it too! It does take practice, overcoming your fears, and getting rid of self-created limitations. Through yoga, you can achieve this by practicing presence and mindful breathing.
Sign up for my newsletter to stay informed. Get the latest news on the latest yoga trainings, tutorials, blog posts, and discounts.